INGROUND GUNITE DESIGN
Gunite pools are the most popular design in much of the United States. To build one of these pools, the construction crew digs a hole, puts the plumbing in place and assembles a framework grid with 3/8-inch steel reinforcing rods (rebar). The rebar rods are spaced about 10 inches apart, and secured together with wire. When the grid is in place, the crew sprays a heavy coating of gunite, a mixture of cement and sand, around the rebar. The sprayer unit combines dry gunite mix with water just before spraying — this produces the wet concrete material. The crew trowels the gunite smooth and lets it sit for a week or so before applying a smooth finish to the rough surface. The most popular finish is called plaster (actually a mixture of cement and marble sand), but a lot of people finish their pools with special concrete paint. Gunite pools can also have tile, exposed aggregate or even fiberglass finishes. Gunite pools (and their cousins, Shotcrete pools) are highly durable, and they can be built in any shape or size.
The Process of Pool Installation
Phase 1: Design, Permits & Pre-dig Inspection
Most parishes or cities require site plans of your pool and yard. A Ladner’s draftsman will forward these plans along with engineered structural drawings to the appropriate department in your parish/city to obtain permits if required. The time required for issuance of these permits can depend on codes or variance issues or your Home Owner’s Associations regulations, in which case you will need written permission. This process can take one week or up to four weeks
Phase 2: The Layout
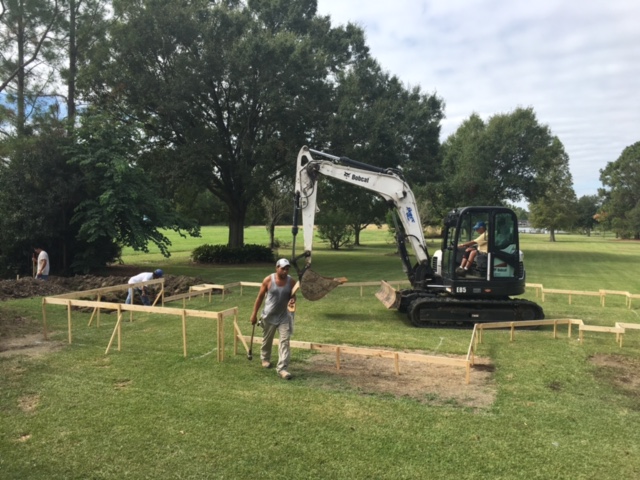
Prior to or morning of excavation one of our Ladner’s Construction Superintendents will layout your pool with either spray paint or string line, using a 1/8 scale drawing of your pool. This is the time to make any changes to your pool. If you decide to make any change in the size or shape of your pool from the original drawing, it will require an addendum to your contract, delay the construction, you will need to sign off on a new draft sketch and you will incur an additional charge of $300.00. Any time there is a change order it will be $300.00 processing fee plus the construction cost of that change.
The following are some points for understanding during the layout stage.
1. The form plank around the pools perimeter is 12″ outside the water line and 2″ – 4″ below the finished grade. “Finished grade” is the surface of the rear edge just 2″ – 4″ above the perimeter form plank. Keep in mind that pool decks or walks should slope away from the pool at a minimum of 1/4″ per foot for proper drainage of the area.
2. It is important that after the forms for the pool have been set, they must remain undisturbed. The slightest change will result in an inaccurate level for your pool. Do not allow anyone to walk on the forms or handle them in any way.
3. Children and pets must stay away from this construction area as there is danger they will get hurt.
Note: In some areas ground conditions require pilings. In this case, prior to excavation, the pilings are driven as per engineering specifications (length and class of pilings). This would be an additional step before excavation.
Phase 3: The Excavation
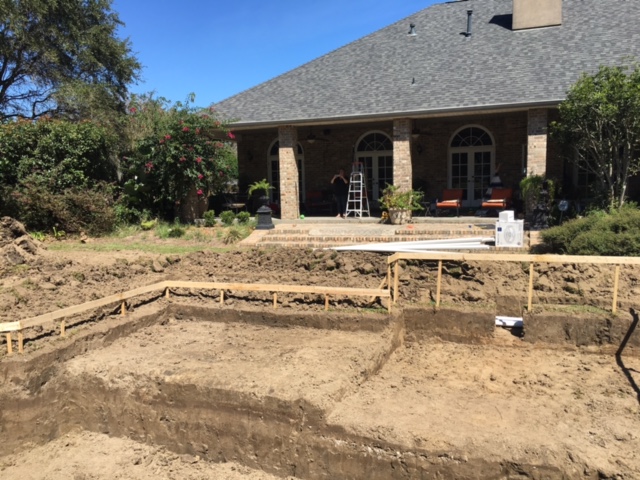
The pool site should be cleared of trees, shrubs, existing deck work and other above ground obstructions. Any trees, shrubs or other plantings to be saved should be removed, cared for and replanted by the customer. Excavation and fill removal is the messiest stage of construction and quite often creates panic for the inexperienced customer. The cure is “patience”. The site cleans up shortly after the excavation process. It should be understood that if you are on excavation allowance specified in your Ladner’s contract and additional excavation is required, either from your request or from unusual ground conditions, the costs could dramatically increase. Normal excavation and fill removal time for the average pool is approximately 1-2 days. Any additional excavation and fill removal cost will be billed accordingly as per contract. You will note the wooden forms around your swimming pool. They are there to guide us in the rest of our construction, please do not tamper with these wooden forms. The majority of dirt from the excavation process will be removed during the excavation. Don’t be concerned if some dirt remains, as we will use this for other phases of the construction. If you would like a portion of this dirt reserved for landscaping purposes or some other uses, just let us know in advance where and how much you desire.
Phase 4: Plumbing and Equipment Placement
Your Ladner’s water leveler will be plumbed to your equipment pad. After completion of your pool, it is up to the customer to call a licensed plumber to connect your water filler to your water feed line. Most parishes require an anti-siphon check valve to be installed so you do not contaminate your drinking water with pool water.
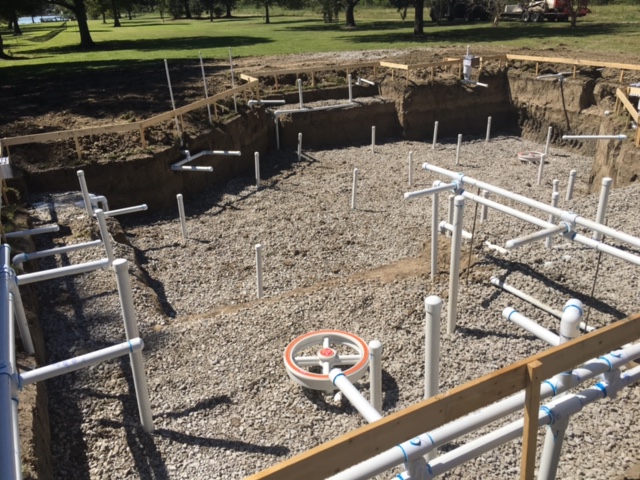
This next phase you will see our plumbers install the Ladner’s Pools plumbing system. The plumbing is installed as per the contract and engineered drawings. A highway of Sch.40 PVC piping is installed to your equipment area and stubbed out so that the equipment slab can be poured. If the Ladner’s infloor cleaning system is included in your contract you will notice a number of pipes protruding from the bottom of the pool. In some cases, when ground conditions are unfavorable, plumbing from pool to the equipment pad will be delayed until after gunite/shot crete (gunite is material that forms the shell of your pools and is 80 times stronger than sidewalk concrete.) See phase 6. the pool is empty, the resulting heat will burn out the light within minutes.
Note: If you have selected a natural gas or LP (liquid propane) gas to heat your pool, then prior to decking a gas line needs to be run/installed. Customer/Buyer is responsible for contracting a licensed plumber (unless otherwise specified in the contract that Ladner’s is responsible). Line is run from meter to equipment area. This is left under pressure for checking by the gas inspector. If the gas line must be placed underneath the decking, the gas line inspection must be made prior to the deck being poured. If you have chosen an electric heater or heat pump no gas line is required.
Phase 5: Steel Placement
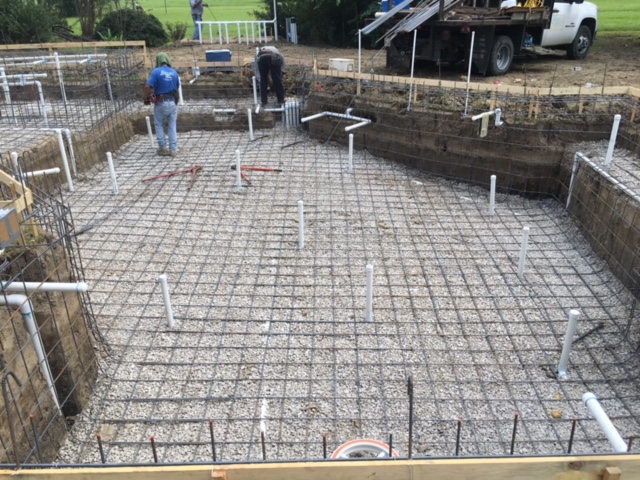
Next, the Ladner’s Pool’s steel crew forms a rigid contoured grid of reinforcing steel to create the backbone of your swimming pool. You will see bars crossing one another for the utmost in reinforcement. Notice the tie wires at some intersections; they tie the steel together. Steel is installed as per the engineered structural drawings. Extra steel is used at various points of high stress which is a highlight of your Ladner’s Pools rebar structural steel process. This takes from 1 to 2 days depending on the size and complexity of your pool. Prior to gunite, there is electrical grounding of brass clamp to rebar with copper ground wire that will be run from pool to pad. Be advised that even though we bend the ends of the steel bars, the steel may be sharp. Please be careful when inspecting the progress of your pool’s construction. You will note that there are block spacers under the steel. This helps to hold the steel above the soil, so the steel will end up being approximately in the middle of the gunite. When steel is complete it will look like the steps are missing; this will be shot in at the time of gunite.
Phase 6: Gunite
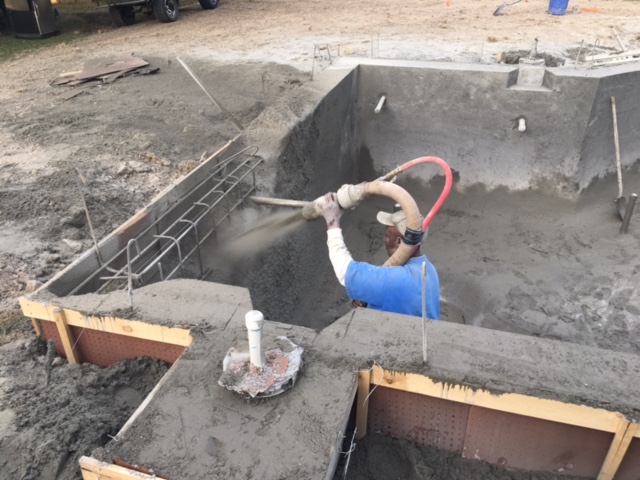
Some parishes/cities may require an inspection at this phase of construction. If no city/parish inspection is required, a Ladner’s foreman will perform an inspection and schedule a gunite crew. The Ladner’s gunite crew will arrive and set up their gunite rig. They will take precautions to protect the area surrounding the pool so that your shrubs, trees and appurtenances will receive maximum protection. The crew then starts the gunite or shotcrete rig and begins to gun the concrete into the pool. Please keep your windows and doors closed while the machine is in operation due to the dust that is created. Please keep children and pets away from the equipment to avoid injury. If there are day sleepers in the home or people that are irritated by excessive noise, this might be a good day to be away from the home as the gunite machine makes a considerable amount of noise and there is no way to avoid it.
Some parishes/cities may require an inspection at this phase of construction. If no city/parish inspection is required, a Ladner’s foreman will perform an inspection and schedule a gunite crew. The Ladner’s gunite crew will arrive and set up their gunite rig. They will take precautions to protect the area surrounding the pool so that your shrubs, trees and appurtenances will receive maximum protection. The crew then starts the gunite or shotcrete rig and begins to gun the concrete into the pool. Please keep your windows and doors closed while the machine is in operation due to the dust that is created. Please keep children and pets away from the equipment to avoid injury. If there are day sleepers in the home or people that Upon completion of the gunite process, the pool will be left to cure for a minimum of one to two weeks. In very hot/dry conditions, the customer should lightly water down the gunite or shotcrete to help the curing process. You (or Ladner’s) will need to water your pool a minimum of three times a day during the daylight, from 7 am to 7 pm. You will need to do this for 5 days. Simply use your garden hose (without a nozzle) and wet the pool thoroughly, top to bottom.
Note: If your pool fills with water during this stage do not worry, as this water is coming in through the well points that are in the floor of the pool and below the water table. We leave these holes so that the pool will not float out of the ground. These holes are filled at a later date and the water will be removed by our crew preparing for the next stage.
At this point in construction, in certain parishes/cities, inspectors will be out to check that our work conforms to electric codes. You will notice an inspection card posted in a conspicuous place on your property, generally somewhere near the pool equipment, on the fence or the side of the house. Under no circumstances should this card be removed.
1st Progress Payment Due
The morning of gunite, the first payment is due. Payments play an important part in the scheduling process of your pool. It is imperative therefore, that we adhere to a firm policy of being paid for the work as outlined in your contract. Your prompt payments will enable us to expedite the construction of your pool.
re irritated by excessive noise, this might be a good day to be away from the home as the gunite machine makes a considerable amount of noise and there is no way to avoid it.
Phase 7: Tile
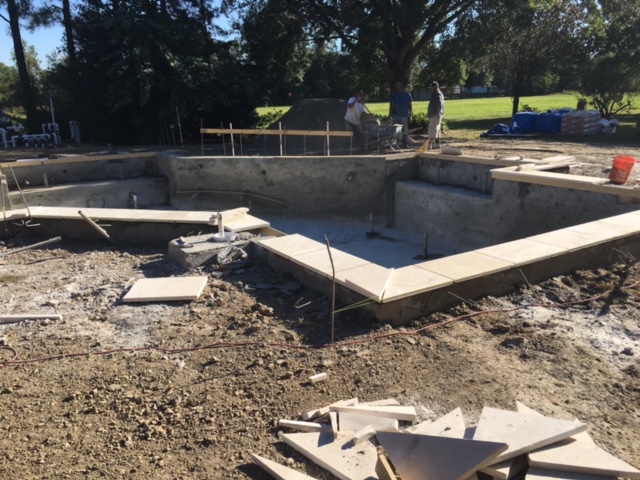
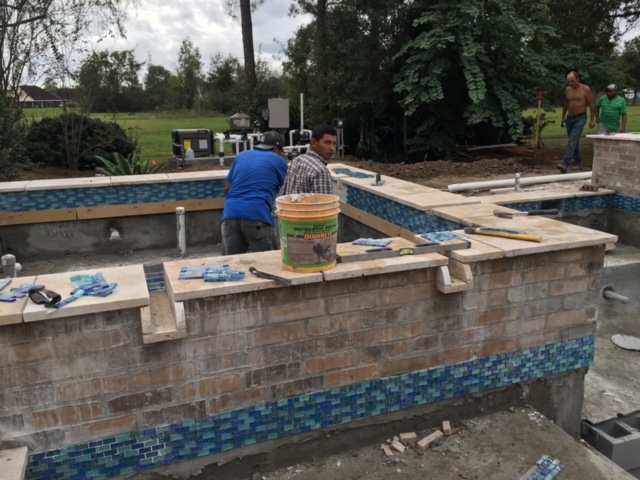
At this phase the tile that you have selected from Ladner’s showroom will be installed. There will be an approximate 6″ band around the waterline of the pool that will be hand-laid and carefully grouted by a skilled craftsperson. Once the tile has set securely, you will have a durable, non-porous surface that will last for years.
If you have chosen to add picturesque rocks, a rock waterfall or other natural rock features, our professional rock installers will carefully place the decorative stones in precise accordance to your pool’s design specifications. This installation usually takes two days for standard/normal pools. Larger pools such as Commercial pools can take up to a week.
Phase 8: Coping
The coping will be hand-laid and grouted on the “Beam” (or wall top) by Ladner’s Pools craftsmen who carefully place your brick, slate, marble or flagstone around the perimeter of your pool and/or spa. There are several different styles of coping that may be used on a pool.
Phase 9: Electrical
At this stage conduits are placed for wiring to underwater light and filter equipment. All Ladner’s switch boxes are set and all metal objects within 5′ of the pool are electrically bonded for safety. Electrical inspection is made at this time. Please do not switch the pool light on before pool is filled. The pool light is constructed to operate submersed in water only.
Phase 10: Decking
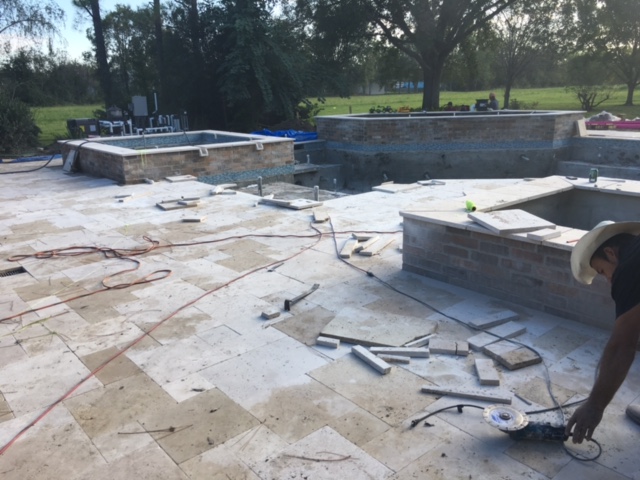
Depending on what decking you picked (your contract choice), your sub deck is poured concrete with mesh and topped with either Kool Deck/Spray Deck, Patterned Concrete, Flagstone, brick, travertine, etc, or if you chose pavers, no sub-deck is required and the ground is prepared for a bed of limestone and sand to support the pavers.
Kool Deck/Spray Deck
For the Spray deck process, a natural concrete base will be poured and will need a curing period of 2 to 7 days, depending on the time of the year. Then an acrylic coating will be applied. This process usually takes about a day.
Patterned Concrete
The process of “stamped” or patterned concrete creates a custom look similar to cobblestone, brick or flagstone. The process begins much like the spray deck process, but then a selected color and pattern is applied to the concrete base.
Natural Stone or Paver Decks
For stone decks, a natural concrete base will be poured, and will cure for 2 to 7 days, depending on the weather. Then the selected stone will be laid and the grout installed. Paver decks are sometimes finished with a fine sand rather than grout between the pavers.
Note: Landscaping and Fencing: Landscaping and fencing may not be in our original contract, however, whoever does your work should understand that fences are required to be a minimum of 42″ high with self latching gates out of reach of children as required by law in most areas. Fencing and landscaping must be in place prior to plastering the pool.
Note: Area drainage should be installed keeping in mind that a minimum ground slope of 1/2″ per foot is required for 25′ or to a positive water course. Uphill slopes should be drained with rock filled trenches covering perforated pipe. The next stage is plastering, but before plastering it is important that all projects which create dust, dirt, muss or smoke (such as raking, burning, gardening, etc.) be completed. Through it all, protect the coping and decking as it stains easily, and also keep debris out of the pool.
Phase 11: Plaster
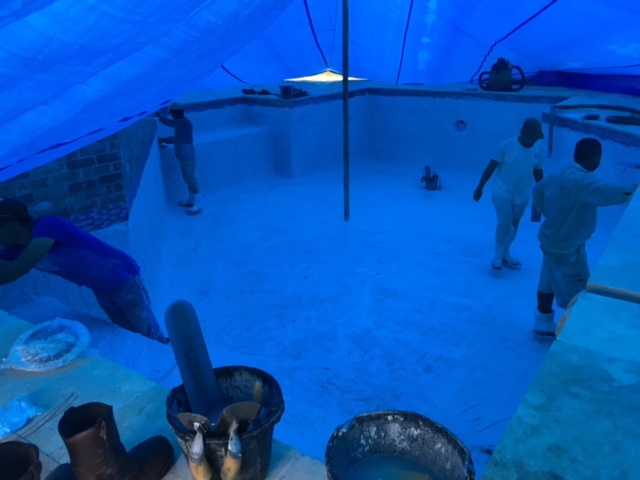
The sparkling clarity of a fine quality pool depends heavily upon keeping the plaster clean through the crucial curing period. Prevent sweeping, burning or yard work in the area until your pool is full of water. This usually takes between 1-3 days. Dirt and dust cause stains on plaster for which Ladner’s Pools cannot be responsible. On plaster day, when the plaster is completed and if the day is warm, the crew will set the hose and turn on water prior to leaving that day. If the day is cool, they will set the hose and instruct you as to when to turn it on. Once the filling has begun, never turn off the water until it has risen to the middle of the waterline tile row. This is to prevent forming of a ring (like bathtub ring) which would be extremely difficult to remove.
3rd and Final Payment:
Morning of plaster payment is due.
Note: Cleanup – Our cleanup crew will remove all our construction debris and leave your yard and access area clean. Ladner’s does not do finish grading, planting or seeding, etc. If any fencing was removed for access, it will be replaced by Ladner’s unless otherwise specified in the contract.
Phase 12: Start-Up
For salt water systems, the salt will be added 14 days after startup by our Ladner’s Technician. Also, your pool cleaner will be installed that day. You have these 14 days to provide us with a punch list and/or any questions you may have about your pool. Of course feel free to call us anytime for assistance you may need with your new pool.
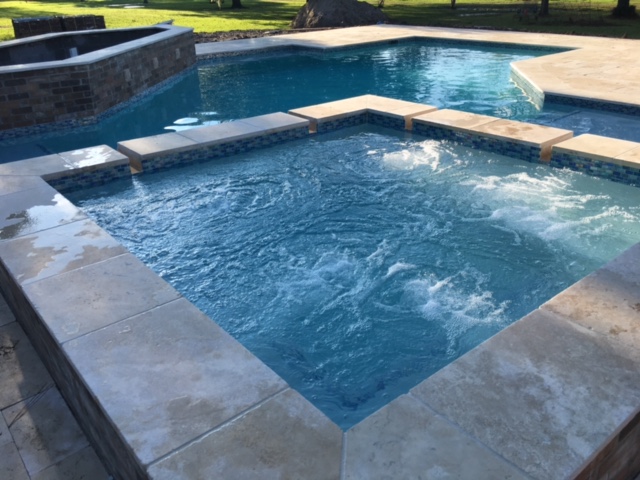
When the pool is full of water our Ladner’s service man will start-up the pool. The service man will put the filter into operation and initially treat your pool water with chemicals. Pool will not be plastered without electrical hook up. If the electrical work is not part of our contract please be sure that final electrical hookup is complete so that we may operate the filtering system. Un-circulated pool water for extended periods of time may cause plaster staining. The pool must be brushed once a day for a period of one month. Homeowners should receive their Ladner’s pool brushing instructions prior to day of start up. You will get manufacturers information on your equipment but in addition, Ladners can also provide for you information on how a pool works, pool equipment, pool maintenance and water chemistry. Please request these items if you are interested in maintaining the pool yourself. If not, a Pool Maintenance Contract can be arranged by simply calling one of our offices nearest to you.
